

Discovering the Zesty Bliss No-Bake Lemon Coconut Energy Bars
In today’s fast-paced world, finding a snack that is both nourishing and satisfying can be a challenge. Enter the Zesty Bliss No-Bake Lemon Coconut Energy Bars—a delightful combination of wholesome ingredients that will tantalize your taste buds and fuel your body. These energy bars are not only easy to prepare but also offer a refreshing twist with their zesty lemon flavor and tropical coconut richness. Whether you’re looking for a post-workout treat, a midday pick-me-up, or a healthy option for kids, these bars pack a punch of flavor and nutrition without the hassle of baking.
In this article, we will explore the ingredients that make up these energy bars, delve into their nutritional benefits, and provide you with a step-by-step preparation process, ensuring that you have all the tools to make this recipe a staple in your kitchen.
Understanding the Ingredients: A Closer Look at the Components
The allure of the Zesty Bliss No-Bake Lemon Coconut Energy Bars lies not only in their delicious taste but also in the carefully selected ingredients that contribute to their overall nutrition and flavor profile. Let’s take a closer look at the key components that make these bars both satisfying and healthful.
Rolled Oats and Their Nutritional Benefits
Rolled oats serve as the base for these energy bars, providing a hearty source of fiber and energy. They are known for their ability to keep you feeling full, making them an excellent option for a snack that sustains you. Oats are rich in beta-glucans, a type of soluble fiber that can help lower cholesterol levels and improve heart health. In addition to their nutritional benefits, rolled oats add a chewy texture to the bars, balancing the creaminess of the nut butter and the sweetness of the dates.
The Sweetness of Medjool Dates
When it comes to natural sweeteners, Medjool dates are a standout choice. Not only do they lend a rich, caramel-like sweetness to the energy bars, but they also provide a boost of energy thanks to their high carbohydrate content. Medjool dates are packed with essential nutrients, including potassium, magnesium, and fiber, making them a healthier alternative to refined sugars. Their sticky texture helps bind the ingredients together, ensuring that each bite is perfectly cohesive.
Coconut: A Tropical Twist
Coconut adds a unique flavor and texture that elevates the energy bars to a new level. Unsweetened shredded coconut is not only a delicious addition but also brings numerous health benefits. It contains medium-chain triglycerides (MCTs), which are known for their potential to boost metabolism and provide a quick source of energy. The subtle sweetness and chewy texture of coconut complement the other ingredients beautifully, making these bars feel indulgent while remaining nutritious.
Nut Butters: Choosing the Right Base
Nut butters play a crucial role in the formulation of these energy bars, acting as a creamy base that binds everything together. Almond butter is a popular choice due to its mild flavor and healthy fat content, but you can also experiment with other nut or seed butters like cashew, peanut, or sunflower seed butter. These options provide healthy fats and protein, contributing to satiety and overall energy levels. When selecting a nut butter, look for varieties that are minimally processed and free from added sugars or hydrogenated oils for the healthiest option.
Lemon: The Zesty Star of the Recipe
No energy bar would be complete without the vibrant addition of lemon. Fresh lemon juice and zest not only provide a bright, refreshing flavor but also pack a nutritional punch. Lemons are an excellent source of vitamin C, which supports the immune system, and they contain antioxidants that can help combat oxidative stress in the body. The acidity of lemon juice balances the sweetness of the dates and adds a lively zing that makes these energy bars truly stand out.
Optional Ingredients: Customizing Your Energy Bars
While the core ingredients create a delicious base for your energy bars, there are several optional ingredients you can incorporate to customize your recipe. For those who prefer a sweeter bar, a drizzle of maple syrup can enhance the flavor profile without overpowering the natural sweetness of the dates. Additionally, consider adding a mix of nuts or seeds for added crunch and a boost of nutrients. Chia seeds, pumpkin seeds, or chopped almonds can provide a delightful texture and increase the nutritional value of your bars.
Step-by-Step Instructions: Crafting Your Energy Bars with Ease
Creating your Zesty Bliss No-Bake Lemon Coconut Energy Bars is a straightforward process that requires minimal equipment and time. Follow these initial steps to begin crafting your delicious energy bars.
Preparing the Base: The Foundation of Flavor
To start, gather all your ingredients. In a food processor, combine the rolled oats and shredded coconut. Pulse them together until they form a coarse mixture, ensuring that the oats are broken down enough to provide a good texture but not so much that they turn into flour. This initial blending is essential as it creates the foundation of flavor and texture for your bars.
The rolled oats should remain somewhat chunky, as this will contribute to the chewiness of the final product. If you prefer a smoother texture, you can pulse the mixture a bit more, but be cautious not to over-process it. Once your base is ready, transfer it to a mixing bowl and set it aside while you prepare the sticky ingredients.
Incorporating Sticky Ingredients: Building Flavor and Cohesion
Next, return to the food processor and add the Medjool dates and nut butter of your choice. Blend until the dates are finely chopped and the mixture begins to clump together. This step is crucial as the sticky nature of the dates and nut butter will bind the bars, providing structure and cohesion.
If you find that the mixture is too dry and crumbly, add a splash of lemon juice or a little water to help bring it together. Conversely, if the mixture is too wet, you can add additional oats or coconut to achieve the desired consistency. Taste the mixture at this stage to determine if you’d like to adjust the sweetness by adding a bit of maple syrup.
Finalizing the Mixture: Ensuring Everything is Well Combined
Once the sticky ingredients are well blended, it’s time to combine them with your oat and coconut mixture. Pour the blended date and nut butter mixture into the bowl with the oats and coconut. Mix thoroughly, using your hands if necessary, to ensure that all ingredients are well combined. The final texture should be sticky yet firm enough to hold together when pressed into a pan.
After mixing, transfer the energy bar mixture into a lined baking dish or a silicone mold. Press it down firmly to create an even layer, ensuring that the bars will hold their shape once chilled. The more compact your mixture, the better the bars will hold together.
With these initial steps completed, you’re well on your way to enjoying your homemade Zesty Bliss No-Bake Lemon Coconut Energy Bars. Stay tuned for the next part of our article, where we will cover the chilling process and additional tips for storage and customization!
Importance of Achieving the Right Stickiness for Forming Bars
When preparing your Zesty Bliss No-Bake Lemon Coconut Energy Bars, achieving the right stickiness in your mixture is crucial for forming cohesive bars. The stickiness primarily comes from the combination of dates and nut butter, which bind the dry ingredients together. If your mixture is too dry, the bars will crumble and won’t hold their shape. Conversely, if it’s overly sticky, they may be difficult to handle.
To ensure you reach that perfect balance, consider the following tips:
– Use Fresh Dates: Ensure your dates are fresh and moist. If they’re hard, soak them in warm water for about 10-15 minutes before blending.
– Adjust Liquid Ingredients: If the mixture is crumbly, add a teaspoon of water or a splash of lemon juice to enhance the stickiness. Blend again until the mixture reaches a sticky yet manageable consistency.
– Test the Mixture: Before pressing the mixture into your baking dish, take a small handful and squeeze it together. If it holds its shape, you’re good to go!
Shaping the Bars: Creating Perfect Portions
Once you’ve achieved the right consistency, it’s time to shape your energy bars. Here’s how to line your baking dish and press the mixture into a perfect form:
Lining the Baking Dish
1. Choose the Right Size Dish: A 9×9-inch square baking dish is ideal for this recipe. If you want thicker bars, you can use an 8×8-inch dish.
2. Use Parchment Paper: Cut a piece of parchment paper large enough to cover the bottom and sides of the dish. This will help with easy removal later. Leave some overhanging paper on the sides for easy lifting.
3. Grease It: Lightly grease the parchment paper with coconut oil or non-stick spray to prevent sticking.
Pressing the Mixture
1. Transfer the Mixture: Spoon the prepared mixture into the lined baking dish, spreading it evenly.
2. Press Firmly: Using a spatula or your hands, firmly press the mixture down into an even layer. Ensure it is tightly packed to help the bars hold together once set.
3. Smooth the Surface: To achieve an even surface, use the back of a spatula to smooth out the top. This will make for cleaner cuts later.
Chilling and Setting: The Key to Firm Energy Bars
Chilling is essential for allowing your Zesty Bliss Energy Bars to set properly. Here’s how to chill and set the mixture effectively:
Chilling Times and Methods
1. Refrigerate: Place the baking dish in the refrigerator and chill for at least 2 hours. This cooling time is crucial as it allows the mixture to firm up and makes slicing much easier.
2. Freezing Option: For quicker setting, you can also place the dish in the freezer for about 30-40 minutes. Just be cautious not to leave it too long, or it may become too hard to cut.
Importance of Allowing the Bars to Firm Up
Allowing enough time for your bars to chill is vital for their texture. If you cut them too soon, they may be too soft and fall apart. By allowing the bars to chill thoroughly, you ensure they maintain their shape and texture, making for an enjoyable eating experience.
Cutting and Serving: Ready to Enjoy
After your energy bars have chilled and set, it’s time to cut and serve them. Follow these tips for the best results:
Lifting Bars from the Dish
1. Remove from the Dish: Use the parchment overhang to gently lift the bars out of the baking dish. This will help preserve the edges and keep the bars intact.
2. Cutting Technique: Place the entire block on a cutting board. Using a sharp knife, slice the block into even portions. Depending on your preference, you can cut them into squares, rectangles, or even bite-sized pieces.
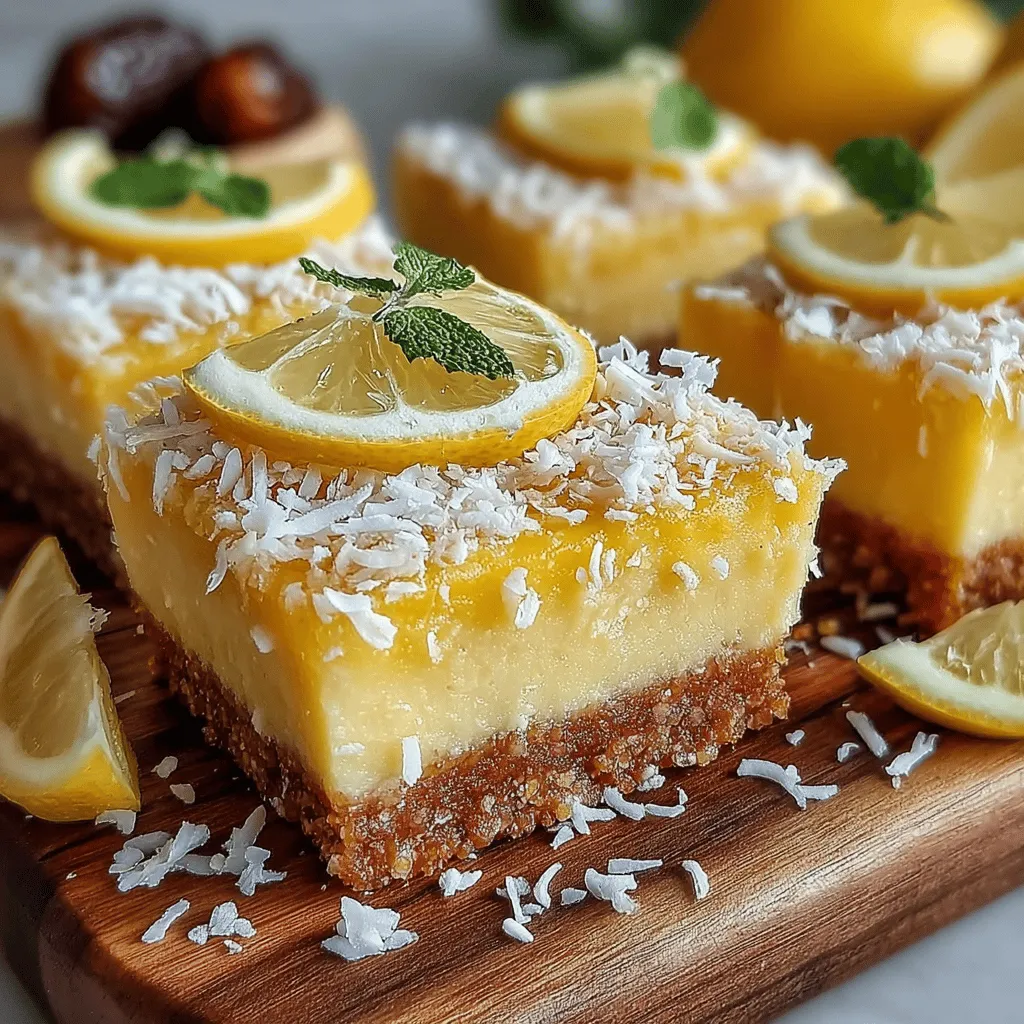
Garnishing with Shredded Coconut
For an extra touch, consider garnishing your energy bars with shredded coconut. After cutting, simply sprinkle some on top for added texture and flavor. You might also drizzle a bit of melted dark chocolate or sprinkle some chopped nuts for variety.
Storage Solutions: Keeping Your Energy Bars Fresh
To maintain the freshness of your Zesty Bliss Energy Bars, proper storage is essential:
Best Practices for Storing Energy Bars
– Airtight Container: Store the bars in an airtight container. This will help keep them fresh for longer while preventing them from drying out or absorbing odors.
– Refrigeration: These bars can be kept in the refrigerator for up to two weeks. This is the best method to ensure they maintain their firm texture and flavor.
Freezing Options for Longer Shelf Life
If you want to extend the shelf life of your energy bars, consider freezing them:
1. Wrap Individually: Wrap each bar in plastic wrap or wax paper. This prevents them from sticking together and makes it easy to grab one at a time.
2. Store in a Freezer Bag: Place the wrapped bars in a freezer-safe bag or container. They can last up to three months in the freezer.
3. Thawing: When you’re ready to enjoy them, simply take one out and let it thaw in the refrigerator or at room temperature for a few minutes.
Nutritional Analysis: The Health Benefits of Zesty Bliss Bars
Understanding the Nutritional Value
These Zesty Bliss Energy Bars are not just delicious but also packed with nutrients. Here’s a breakdown of what you can expect per bar (assuming you make 12 bars from the recipe):
– Calories: Approximately 150-180 calories
– Carbohydrates: 20-25 grams, primarily from natural sources like dates
– Protein: 3-5 grams, depending on the nut butter used
– Fat: 6-10 grams, mostly healthy fats from coconut and nut butter
– Fiber: 3-4 grams, promoting digestive health
Contribution to a Balanced Diet
Incorporating these energy bars into your diet can contribute to your daily nutrient intake. They are an excellent source of natural sugars for quick energy, healthy fats for satiety, and fiber for digestive health. Whether you consume them as a pre-workout snack or a mid-afternoon boost, they fit seamlessly into a balanced diet.
Energy Boosting: The Perfect Snack for Active Lifestyles
These energy bars are ideal for those with active lifestyles, including athletes and busy individuals. Packed with natural ingredients, they provide a quick source of energy without the crash associated with processed snacks.
Enhancing Performance for Athletes and Busy Individuals
Energy bars can be a game changer in your nutritional arsenal. They not only satisfy hunger but also provide the necessary fuel for workouts, making them perfect for pre- or post-exercise snacks. For busy professionals, having a nutritious bar on hand can prevent the temptation to reach for unhealthy options during hectic workdays.
Importance of Healthy Snacking for Sustained Energy Levels
Healthy snacking is essential for sustained energy levels throughout the day. These Zesty Bliss Energy Bars help maintain stable blood sugar levels, preventing energy crashes that can occur with sugary snacks. By choosing wholesome ingredients, you can keep your energy levels steady and support overall health.
Versatility and Customization: Making It Your Own
One of the best aspects of these energy bars is their versatility. You can easily customize the recipe to suit your taste preferences or dietary needs.
Flavor Variations: Experimenting with Ingredients
Feel free to get creative and experiment with different flavors. Here are some suggestions:
– Spices: Add a teaspoon of ground ginger or cinnamon for a warm flavor profile.
– Nut and Seed Butters: Swap almond butter for peanut butter or sunflower seed butter for a nut-free option. Each variation offers a unique taste and nutritional profile.
Dietary Considerations: Gluten-Free and Vegan Options
This recipe is naturally gluten-free and vegan, making it a great choice for those with dietary restrictions. Ensure that the ingredients you select, such as oats and nut butter, are certified gluten-free if necessary.
Conclusion: Embracing Healthy Snacking with Zesty Bliss Bars
In summary, the Zesty Bliss No-Bake Lemon Coconut Energy Bars are not only a delicious snack but also a convenient and nutritious option for anyone seeking to maintain a healthy lifestyle. With a blend of wholesome ingredients that provide energy, fiber, and essential nutrients, these bars are perfect for a quick bite on the go or a satisfying treat at home. By following the simple steps outlined in this article, you can enjoy the process of making your own energy bars tailored to your taste preferences. Embrace the joy of healthy snacking and let the zesty flavor of lemon and the richness of coconut elevate your daily routine.