
Crunchy Delight Chicken Tenders Recipe
Introduction
Chicken tenders hold a special place in the culinary world, celebrated for their crispy exterior and juicy interior. These delightful morsels are not just kid-friendly; they appeal to adults as well, making them a staple at family gatherings, parties, and casual dining experiences. The appeal of chicken tenders lies in their versatility and comfort, often evoking nostalgia for simpler times. Whether served as a snack, appetizer, or main course, chicken tenders are a beloved choice that never goes out of style.
Introducing the Crunchy Delight Chicken Tenders, a recipe that elevates this classic dish to new heights. With a perfectly crispy texture and a burst of flavor in every bite, these homemade chicken tenders are a fantastic alternative to store-bought versions. By preparing them at home, you not only control the ingredients but also ensure a fresher and healthier outcome. This recipe embraces quality ingredients and a special breading technique, making it an irresistible choice for any chicken tender lover.
Understanding Chicken Tenders
But what exactly are chicken tenders? Also known as chicken strips or chicken fingers, these pieces are cut from the tenderloin of the chicken breast, which is why they are so soft and tender. Unlike the more generic chicken breast cutlets, tenders are characterized by their unique shape and texture, making them ideal for frying, baking, or grilling. Their popularity extends across various cuisines, often served in diverse styles, from classic Southern-fried chicken tenders to Asian-inspired versions coated in sesame seeds and served with sweet chili sauce.
The versatility of chicken tenders is one of their greatest assets. They can be enjoyed in numerous ways: as a quick snack with your favorite dipping sauce, as part of a hearty salad, or even as a sandwich filling. Their adaptability allows them to shine in various meal types, appealing to different taste preferences and dietary needs. This makes them a fantastic option for meal prep, family dinners, or casual entertaining, where you want to please a crowd without much hassle.
Ingredients Breakdown
To create the perfect Crunchy Delight Chicken Tenders, having the right ingredients is crucial. Here’s a detailed overview of what you’ll need:
1. Chicken: The star of the dish is boneless, skinless chicken breasts, which provide the perfect balance of tenderness and flavor. When selecting chicken, look for fresh, high-quality pieces to ensure your tenders are juicy and delicious.
2. Buttermilk: This ingredient plays a vital role in marinating the chicken. Buttermilk not only adds flavor but also helps to tenderize the meat, making it moist and succulent. The acidity in buttermilk breaks down the protein, resulting in a more tender bite.
3. Seasonings: A blend of garlic powder, paprika, salt, and pepper enhances the flavor profile of the chicken tenders. Garlic powder adds an aromatic kick, while paprika contributes a subtle smokiness and vibrant color. Adjusting the amount of salt and pepper allows for personal preference, ensuring your tenders are perfectly seasoned.
4. Breading: The crunch factor comes from a combination of all-purpose flour and panko breadcrumbs. The flour acts as a base, helping the breadcrumbs adhere to the chicken, while panko provides an extra crunch due to its larger flakes. For those who enjoy a bit of heat, adding cayenne pepper to the breading can elevate the flavor and give your tenders a spicy kick.
5. Dipping Sauce Ingredients: No chicken tenders are complete without a delicious dipping sauce. For the Crunchy Delight Chicken Tenders, a creamy sauce made with mayonnaise serves as the base. To balance the richness, honey adds sweetness, Dijon mustard introduces a tangy note, and apple cider vinegar provides a slight acidity, bringing all the flavors together beautifully.
Step-by-Step Instructions
Marinating the Chicken
The first step in creating your Crunchy Delight Chicken Tenders is marinating the chicken. This step is crucial for infusing the meat with flavor and ensuring it remains tender during cooking. Begin by cutting your boneless, skinless chicken breasts into strips. Aim for uniform sizes, as this will help them cook evenly.
Next, prepare your buttermilk marinade. In a large mixing bowl, combine the buttermilk with garlic powder, paprika, salt, and pepper. Whisk until well combined. Submerge the chicken strips in the buttermilk mixture, ensuring they are fully coated. It’s essential to let the chicken marinate for at least 30 minutes, but for the best results, aim for 2 to 4 hours. This extended marination allows the flavors to penetrate deeply into the meat, resulting in a more flavorful and juicy tender.
While the chicken marinates, you can prepare your breading station. This setup is essential for achieving that coveted crispy coating. Begin by placing the flour in one shallow dish, the egg wash in another (made with beaten eggs and a splash of water), and the panko breadcrumbs mixed with salt, pepper, and optional cayenne in a third dish.
With the chicken marinated and your breading station ready, you’re well on your way to creating Crunchy Delight Chicken Tenders that will impress family and friends alike. Stay tuned for the next part of this article, where we’ll dive into the frying process and tips for achieving the ultimate crunchy texture.
Setting Up for Success: The Three Shallow Dishes
Achieving the perfect crust on your Crunchy Delight Chicken Tenders begins with the setup of three shallow dishes. Each dish plays a crucial role in the breading process, allowing for an even coating that results in a crispy exterior.
1. Dish One: Place all-purpose flour in the first shallow dish. This initial coating helps dry the chicken pieces and provides a base for the egg wash to adhere.
2. Dish Two: In the second dish, whisk together eggs and a splash of milk. This egg wash binds the breadcrumbs to the chicken, ensuring a cohesive crust.
3. Dish Three: Finally, fill the third dish with seasoned breadcrumbs. Choose your favorite variety—panko breadcrumbs are an excellent option for extra crunch, while regular breadcrumbs work just fine.
Organizing your workspace with these three dishes not only streamlines the breading process but also minimizes mess. This methodical approach ensures each chicken tender is evenly coated, leading to a satisfying crunch in every bite.
Breading the Chicken
Now that your stations are set, it’s time to bread the chicken. This step is crucial for achieving that delightful crunch.
Step-by-Step Breading Process
1. Prep the Chicken: Start with boneless, skinless chicken breasts. Slice them into even strips, approximately 1-inch wide. Uniform pieces ensure even cooking.
2. Flour Coating: Take a chicken strip and dredge it in the flour, ensuring an even coat. Shake off any excess flour, as too much can lead to a clumpy texture.
3. Egg Wash: Next, dip the floured chicken into the egg wash, allowing it to fully coat. This step is crucial for binding the breadcrumbs.
4. Breadcrumb Coating: Finally, press the chicken strip into the seasoned breadcrumbs, ensuring every inch is covered. Use your fingers to gently press the breadcrumbs onto the chicken to create a thick coating.
5. Repeat: Continue this process for each chicken strip, placing the breaded tenders on a parchment-lined baking sheet. Allow the tenders to rest for about 10 minutes before baking. This resting time helps the coating adhere better during cooking.
Baking the Chicken
Baking is where the magic happens. The right oven temperature and baking time are essential for achieving golden-brown, crispy chicken tenders.
Oven Temperature and Baking Time
Preheat your oven to 425°F (220°C). This high temperature is critical for creating that enticing crunch while keeping the chicken juicy. Bake the tenders for about 15-20 minutes, flipping them halfway through to ensure even cooking.
Importance of Flipping
Flipping the chicken tenders halfway through the baking process allows for optimal heat distribution. This step ensures both sides develop that coveted golden-brown color and crispiness. Use tongs to flip the tenders gently, ensuring they remain intact.
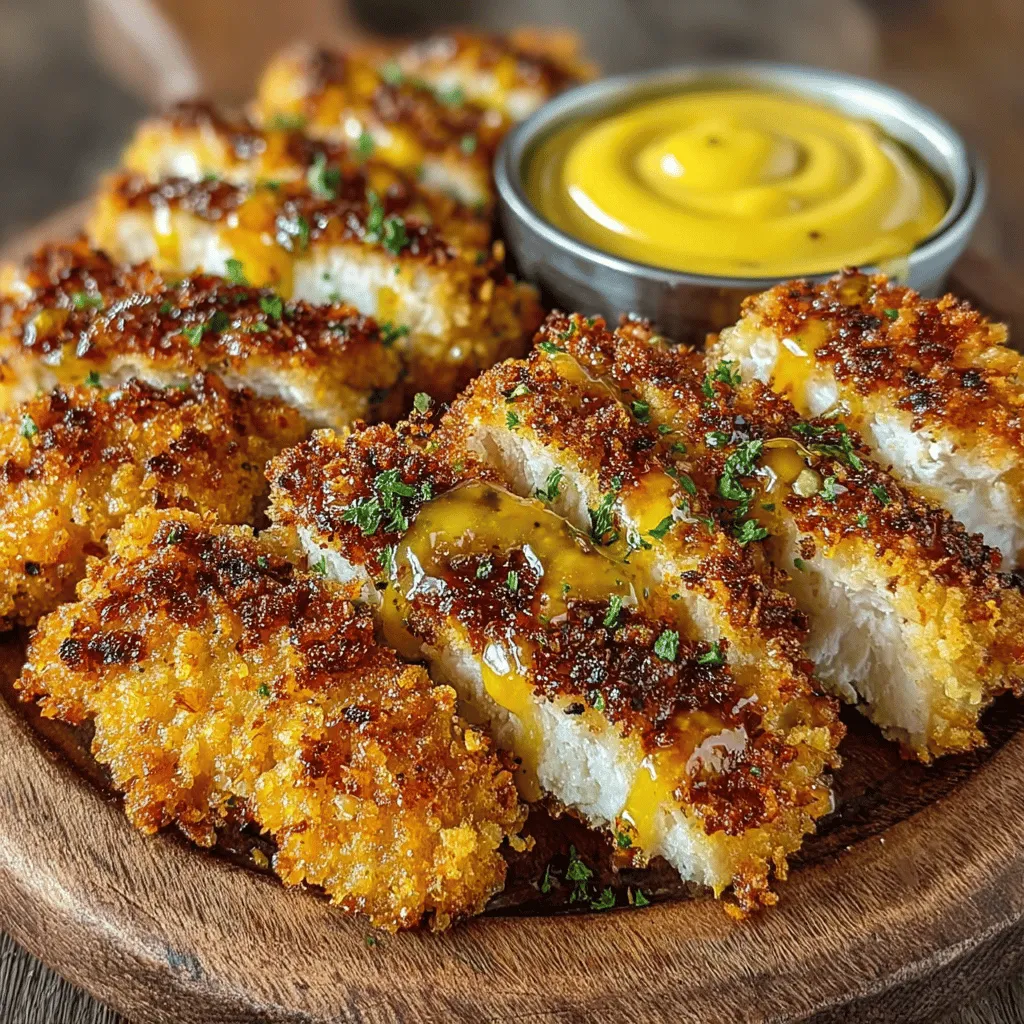
Making the Dipping Sauce
No chicken tender is complete without a delicious dipping sauce. Whipping up a homemade sauce is simple and allows for customization to suit your taste.
Whisking Together the Sauce
1. Base Ingredients: In a small bowl, combine mayonnaise, ketchup, and a splash of Worcestershire sauce. This mixture forms the base of your dipping sauce.
2. Flavor Adjustments: Add a teaspoon of garlic powder and a pinch of salt for flavor. For a touch of heat, consider incorporating a few drops of hot sauce or a sprinkle of cayenne pepper.
3. Mix and Taste: Whisk the ingredients together until smooth. Taste the sauce and adjust the seasonings as needed. If you prefer a sweeter sauce, add a dash of honey or sugar.
4. Chill: For the best flavor, let the sauce chill in the refrigerator for at least 30 minutes before serving.
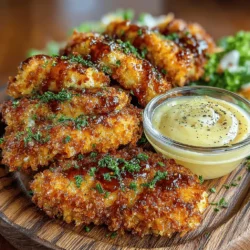
Serving the Chicken Tenders
Presentation is key when serving your crunchy chicken tenders.
Presentation Ideas
Arrange the freshly baked tenders on a large serving platter. To elevate your presentation, garnish with fresh herbs such as parsley or chives. Consider placing small bowls of your homemade dipping sauce alongside the tenders for easy access.
Cooling Time and Pairings
Before serving, allow the chicken tenders to cool slightly for about 5 minutes. This brief cooling period helps retain their crispiness and prevents burns from hot chicken.
Pair your chicken tenders with the prepared dipping sauce for a delightful flavor combination. These tenders also pair well with a variety of sides such as:
– Classic Fries: Crispy, golden fries are a traditional pairing that complements the tender’s crunch.
– Fresh Salads: A light salad with a zesty vinaigrette can balance the richness of the chicken.
– Steamed Vegetables: For a healthier option, serve alongside steamed broccoli or green beans.
Health Benefits of Homemade Chicken Tenders
Homemade chicken tenders offer numerous health benefits compared to their store-bought counterparts.
Nutrition Comparison
Store-bought chicken tenders are often processed and loaded with preservatives, unhealthy fats, and excess sodium. By making them at home, you control the ingredients, ensuring a more nutritious option.
Control Over Ingredients
One of the primary advantages of homemade chicken tenders is the ability to control the ingredients. You can opt for lower sodium options, avoid preservatives, and choose healthier oils for cooking.
Fresh Ingredients
Using fresh ingredients enhances not only the flavor but also the health impact of your meal. Fresh herbs, spices, and high-quality chicken lead to richer taste profiles and more nutritional value.
Creative Variations and Pairings
Get creative with your Crunchy Delight Chicken Tenders by exploring various variations and pairings.
Suggested Variations
– Spice Levels: Adjust the seasoning in your breadcrumb mixture by adding spices such as smoked paprika, cayenne pepper, or Italian seasoning for a flavor boost.
– Different Coatings: Experiment with alternative coatings, such as crushed cornflakes, coconut flakes, or even a gluten-free breadcrumb option for those with dietary restrictions.
Side Dish Ideas
Complement your chicken tenders with sides that enhance the meal:
– Sweet Potato Fries: Baked sweet potato fries add a sweet contrast and are packed with nutrients.
– Coleslaw: A tangy coleslaw offers a refreshing crunch that pairs beautifully with the chicken.
– Roasted Veggies: Roasted carrots, zucchini, or bell peppers add color and nutrition to your plate.
Exploring Dipping Sauces
Beyond the classic sauce, consider these exciting options:
– Barbecue Sauce: A smoky barbecue sauce adds a sweet and tangy element that many enjoy.
– Ranch Dressing: The creamy texture of ranch dressing is a favorite for dipping.
– Spicy Mustard: For those who love a kick, spicy mustard can elevate the flavor profile.
Conclusion
Crunchy Delight Chicken Tenders are not only a delicious and easy-to-make dish but also a versatile option suitable for various occasions. Whether you’re hosting a game day gathering, preparing a family dinner, or looking for a fun meal prep option, these chicken tenders deliver on taste and texture.
Embrace the joy of cooking and sharing homemade meals with family and friends. By following this recipe, you can create a dish that is sure to please everyone at the table. Enjoy the satisfaction of serving up a crunchy, flavorful treat that brings smiles and compliments all around. Don’t forget to experiment with variations and dipping sauces to make this dish truly your own!