No-Bake Banana Split Bars: A Delightful Treat for Any Occasion
When it comes to indulgent desserts, few can rival the classic banana split. This beloved treat, traditionally made with scoops of ice cream, fresh banana slices, and a drizzle of chocolate sauce, has been a staple in American ice cream parlors since the early 1900s. However, as culinary trends have evolved, so too has the way we enjoy this delightful combination of flavors. Enter the no-bake banana split bars—a modern twist that captures all the joy of the original dessert but with a fraction of the effort. These bars are not only visually appealing but also incredibly easy to prepare, making them a perfect choice for gatherings, picnics, or simply a sweet indulgence at home.
What makes no-bake banana split bars particularly appealing is the simplicity of their preparation. With no need for an oven, you can whip up this delicious dessert in no time, allowing you to spend more time enjoying it with friends and family rather than fussing over complicated baking processes. The creamy layers of banana, whipped cream, and chocolate meld seamlessly together, creating a harmonious blend of flavors and textures that will leave your taste buds singing. Whether you’re a novice in the kitchen or a seasoned baker, this recipe is accessible and rewarding.
Understanding the Origins of Banana Split Bars
To fully appreciate the no-bake banana split bars, it’s worth exploring the history behind the classic banana split dessert. The banana split is said to have been invented in 1904 by a 23-year-old apprentice pharmacist named David Strickler in Latrobe, Pennsylvania. Strickler’s creation featured a banana cut lengthwise and served with three scoops of ice cream, topped with various syrups, nuts, and whipped cream. This inventive dessert quickly gained popularity and became a favored treat across the United States.
As culinary creativity blossomed over the decades, the traditional banana split evolved into various forms, including the no-bake bar version we celebrate today. No-bake desserts have surged in popularity in recent years, especially among home cooks who appreciate the ease and convenience they offer. The no-bake banana split bars retain the essence of the classic dessert while introducing a new layer of simplicity, making them a go-to option for busy families and dessert enthusiasts alike.
Ingredients Breakdown
The success of no-bake banana split bars hinges on the quality of the ingredients used. Let’s break down the primary components of this delightful recipe and their roles in creating the perfect dessert.
– Graham Cracker Crumbs: Serving as the foundation for the bars, graham cracker crumbs provide a sweet, crunchy texture that complements the creamy layers above. They also help to bind the entire dessert together.
– Unsweetened Cocoa Powder: This ingredient adds a rich chocolate flavor that balances the sweetness of the bananas and the cream. Unsweetened cocoa powder is essential, as it allows you to control the sweetness of the bars while adding depth to their taste.
– Fresh Fruits (Bananas and Pineapple): Ripe bananas are crucial for achieving the best flavor in your bars. They should be soft and sweet, providing a natural sweetness and a creamy texture. Pineapple, often included in banana split variations, adds a bright, tangy contrast that enhances the overall flavor profile.
– Whipped Cream Options: Whether you choose to use store-bought whipped topping or make your own whipped cream from scratch, this ingredient provides a light, airy texture that elevates the dessert. The creaminess of the whipped layer is vital for achieving that classic banana split experience.
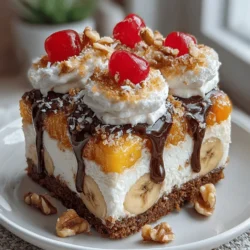
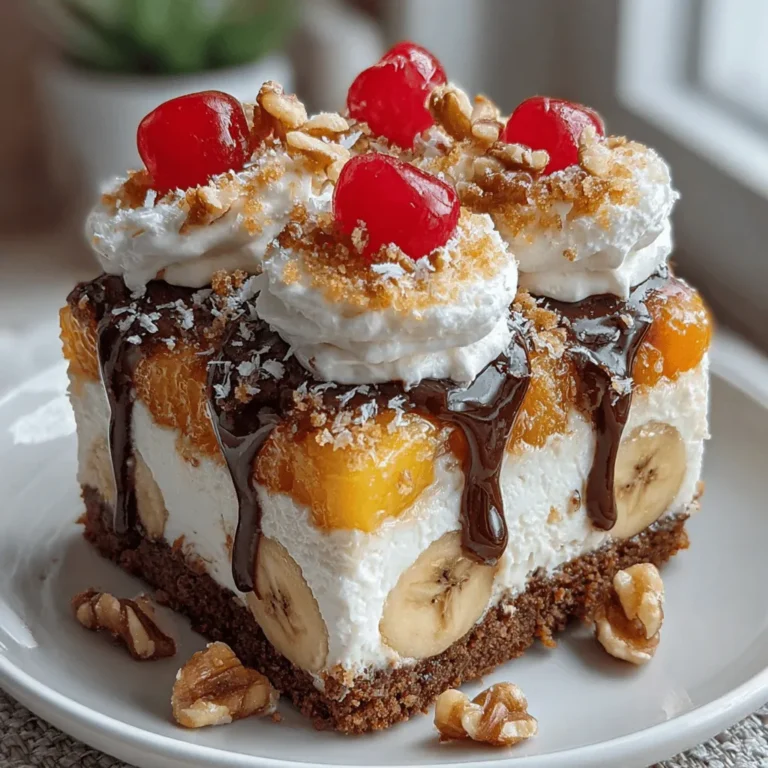
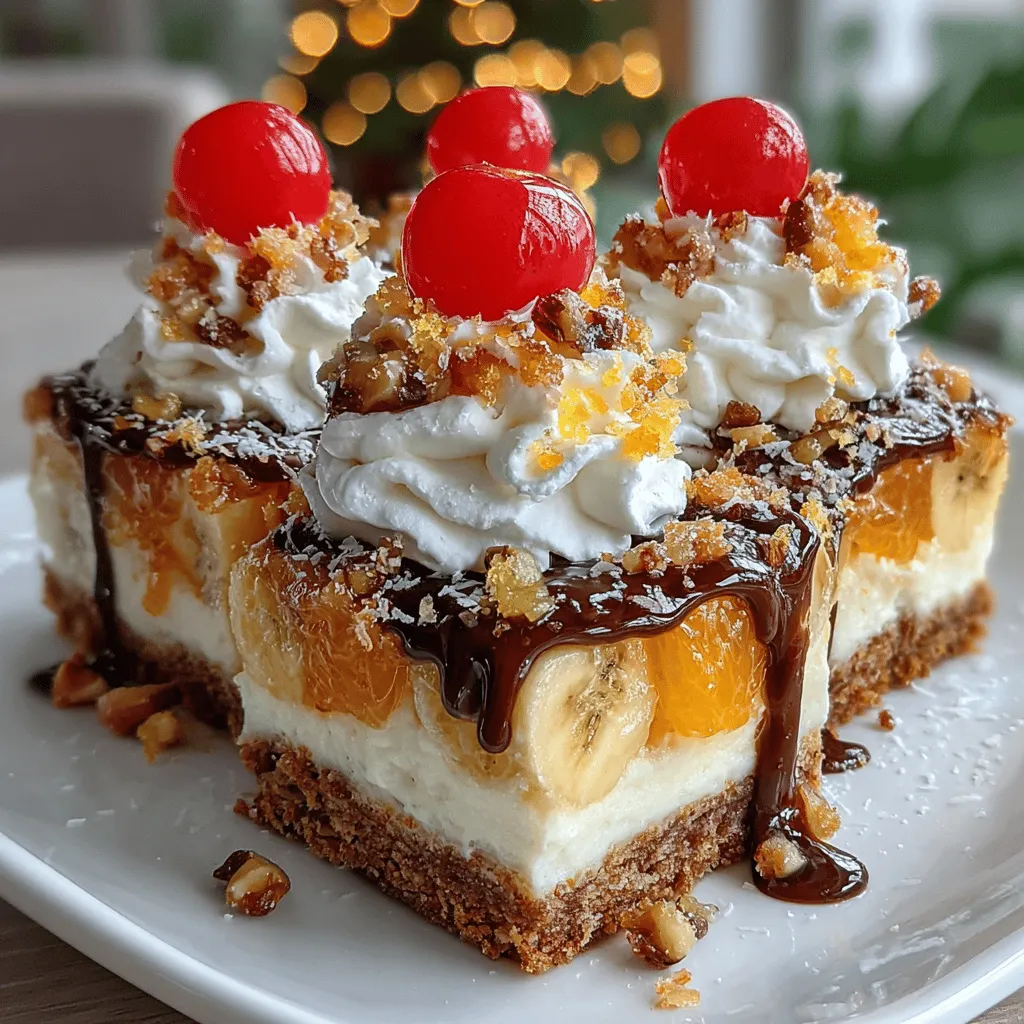
– Nuts and Toppings: Chopped nuts, such as walnuts or pecans, can be sprinkled on top for added crunch and flavor. Additionally, various toppings like chocolate sauce, maraschino cherries, and shredded coconut can personalize your bars and make them even more indulgent.
Step-by-Step Instructions for No-Bake Banana Split Bars
Now that you understand the appeal and origins of no-bake banana split bars, let’s dive into the preparation process. The first step involves creating a solid crust that will serve as the base for your bars.
1. Prepare the Crust: Start by crushing graham crackers into fine crumbs. You can do this by placing them in a zip-top bag and using a rolling pin or by pulsing them in a food processor. Once you have your crumbs, combine them with melted butter and a bit of sugar in a mixing bowl. The melted butter is essential, as it will help bind the crumbs together, creating a firm base for your bars.
2. Press the Mixture into a Pan: Transfer the crust mixture into a lined baking dish, using your hands or the back of a measuring cup to press it down evenly. The goal is to create a compact layer that will hold up well when sliced. Make sure to press firmly, especially at the edges, to prevent the crust from crumbling later.
3. Chill the Crust: Once the crust is evenly pressed into the pan, place it in the refrigerator for about 30 minutes. Chilling the crust is crucial for achieving the right texture and firmness, allowing it to set before you add the next layers.
After the crust has chilled, you’re ready to layer on the delicious fillings that will make your no-bake banana split bars a hit. Stay tuned for the next part of the recipe, where we will explore how to layer the bananas, whipped cream, and other toppings to create a stunning dessert that’s sure to impress.
Layering Process for a Balanced Flavor Profile
To create the perfect No-Bake Banana Split Bars, the layering process is crucial for achieving a balanced flavor profile. Start by preparing your base layer, which typically consists of crushed graham crackers mixed with melted butter. This layer provides the foundational crunch that contrasts beautifully with the creamy layers above.
Building the Layers
1. Graham Cracker Base: Press the graham cracker mixture firmly into the bottom of your pan. This will act as a sturdy foundation.
2. Cream Cheese Layer: Next, spread a layer of cream cheese mixed with sugar and vanilla extract. This layer adds a creamy, sweet contrast.
3. Banana Layer: Arrange sliced bananas evenly over the cream cheese layer. Be sure to use ripe bananas for the best flavor, and consider that they will add moisture to the bars.
4. Pineapple Layer: Follow with a layer of pineapple tidbits. Drain the juice well before adding to avoid sogginess, as excess moisture can compromise the structure of the bars.
5. Whipped Cream Layer: Top off with a layer of whipped cream, which brings a light and airy texture to the dessert.
Tips for Arranging Bananas and Pineapples
When arranging the bananas and pineapples, aim for an even distribution. This ensures every bite is packed with flavor. Here are a few tips:
– Banana Placement: Slice the bananas into even, thin rounds to avoid overpowering the cream cheese layer. Arrange them close together to minimize gaps.
– Pineapple Distribution: Scatter the pineapple tidbits evenly, ensuring they are not clumped in one area. This will help in achieving a balanced flavor with each bite.
Creating the Whipped Cream Layer
The whipped cream layer is what makes these bars feel indulgent. You can either make homemade whipped cream or use store-bought options.
Homemade vs. Store-Bought Options
– Homemade Whipped Cream: To make your own, simply whip heavy cream with a mixer until soft peaks form, then add a touch of powdered sugar and vanilla extract. Homemade whipped cream is fresher and can be adjusted to your desired sweetness.
– Store-Bought Whipped Cream: If you’re short on time, a high-quality store-bought whipped cream can save the day. Look for brands that contain minimal additives and preservatives for a more natural taste.
Final Assembly and Garnishing Techniques
Once all layers are prepared, it’s time for the final assembly. Carefully spread the whipped cream layer on top of the pineapple layer, smoothing it out with a spatula.
Garnishing for Visual Appeal
Garnishing your No-Bake Banana Split Bars enhances visual appeal and adds texture. Here are a few techniques:
– Chocolate Drizzle: Melt some chocolate chips and drizzle over the top for a decadent finish.
– Chopped Nuts: Sprinkle chopped walnuts or pecans for a crunchy element that complements the soft layers.
– Coconut Flakes: Toasted coconut flakes can add a lovely tropical touch, enhancing the banana and pineapple flavors.
Chilling and Setting the Bars
Chilling is an essential step in creating the perfect No-Bake Banana Split Bars. It allows the layers to meld together and set, creating a cohesive dessert that’s easy to cut and serve.
Why Chilling is Essential
Chilling firms up the whipped cream and allows the flavors to develop. Without sufficient chilling time, the bars may be too soft and difficult to slice.
Optimal Chilling Times
For best results, chill your assembled bars in the refrigerator for at least 4 hours, though overnight is preferable. This ensures that all layers are set properly and flavors are melded together.
Tips for Achieving a Perfect Set Without Baking
– Use Cold Ingredients: Start with cold cream cheese and heavy cream to help the mixture whip up nicely and hold its shape.
– Avoid Excess Liquid: Make sure your fruit is well-drained to prevent a soggy base.
Serving Suggestions
Now that your bars are perfectly chilled and set, it’s time to serve them! Here are some delightful ideas for pairing and presentation.
Pairing with Beverages
These No-Bake Banana Split Bars pair wonderfully with various beverages. Try serving them with:
– Coffee: The rich flavors of coffee complement the sweetness of the bars nicely.
– Iced Tea: A refreshing glass of iced tea can balance the dessert’s creaminess.
– Milk: Classic and comforting, a glass of cold milk is a timeless pairing.
Presentation Tips for Hosting
When hosting, presentation matters. Here are a few tips to elevate your serving style:
– Cut into Neat Squares: Use a sharp knife to cut the bars into uniform squares for a polished look.
– Layered Dessert Cups: For a more casual presentation, consider layering the components in individual cups, creating a mini version of the bars.
Variations for Different Occasions
Feel free to personalize these bars for various occasions:
– Holiday Version: Add festive colors by incorporating seasonal fruits like strawberries or blueberries.
– Chocolate Lovers: Mix cocoa powder into the cream cheese layer for a chocolatey twist, or add chocolate chips between the layers.
Nutritional Information and Health Considerations
It’s important to consider the nutritional content of your No-Bake Banana Split Bars, especially if you’re mindful of your dietary intake.
Analysis of Calories and Macros Per Serving
On average, each bar contains approximately 250 calories, 10g of fat, 35g of carbohydrates, and 3g of protein. These values can vary based on portion size and specific ingredients used.
Healthier Substitutions
For those looking to lighten the dessert, consider these substitutions:
– Low-Sugar Options: Use a sugar substitute or reduce added sugars in the cream cheese layer to lower overall calories.
– Greek Yogurt: Substitute some of the cream cheese with Greek yogurt for added protein and a tangy flavor.
Considerations for Dietary Restrictions
– Gluten-Free Alternatives: Use gluten-free graham crackers or crushed nuts for the base to make this dessert suitable for gluten-sensitive guests.
– Dairy-Free Options: Substitute cream cheese with a dairy-free alternative and use coconut whipped cream for a delicious vegan version.
Conclusion
The No-Bake Banana Split Bars are not only easy to make but also a delicious treat that everyone will love. With layers of creamy goodness, fruity flavor, and a crunchy base, they are the perfect dessert for any occasion.
We encourage you to try making this delightful dessert at home. Whether for a family gathering, a picnic, or simply a sweet craving, these bars are sure to bring joy to your table.
Desserts like these not only satisfy the sweet tooth but also create moments of sharing and enjoyment with family and friends. So gather your ingredients, follow the steps, and enjoy the delightful experience of making and sharing your No-Bake Banana Split Bars!