
Introduction
Crispy chicken tenders have earned their place as a beloved staple in kitchens across the globe. Whether served as a comforting family dinner, a crowd-pleasing appetizer for game day, or simply a satisfying snack on a quiet evening, these tender morsels are universally adored. The addition of a tangy honey mustard dip not only elevates the dish but also introduces a delightful balance of sweet and savory that tantalizes the taste buds. In this article, we’ll delve into the captivating world of crispy chicken tenders and provide you with a detailed recipe that guarantees a satisfying crunch and a burst of flavor in every bite.
Originating from the classic American comfort food repertoire, chicken tenders are both simple and versatile. Their humble beginnings can be traced back to the 1980s, when fast-food chains popularized breaded and fried chicken strips, capturing the hearts of food lovers everywhere. Over the years, the recipe has evolved, with home cooks experimenting with various marinades, coatings, and dipping sauces. Our version combines the best of tradition with a modern twist, ensuring that these chicken tenders are not only easy to prepare but also perfect for any occasion.
Understanding the Ingredients
To create the perfect crispy chicken tenders, it’s essential to understand the role each ingredient plays in the overall texture and flavor of the dish. Let’s take a closer look at the key components that make this recipe shine:
Chicken Breast
At the heart of our chicken tenders is the chicken breast, a lean protein that provides both flavor and nutrition. Choosing high-quality, fresh chicken breast is crucial for achieving tender, juicy results. When cut into strips, chicken breast becomes the ideal canvas for our marinade and coating, ensuring that every bite is succulent and satisfying.
Buttermilk
One of the secrets to achieving flavorful and tender chicken tenders is the use of buttermilk. This ingredient serves two main purposes: it acts as a tenderizer and infuses the chicken with a rich, creamy flavor. The acidity in buttermilk breaks down the proteins in the chicken, resulting in a more tender texture. Additionally, it helps the seasonings adhere to the chicken, enhancing the overall flavor profile.
Seasonings
To elevate the taste of our chicken tenders, we incorporate a blend of seasonings, including garlic powder, onion powder, smoked paprika, and oregano. Each of these ingredients adds depth and complexity to the dish. Garlic and onion powders provide a savory base, while smoked paprika adds a subtle hint of smokiness that complements the chicken perfectly. Oregano lends a touch of herbal freshness, rounding out the flavor profile and making each bite a delight.
Coating
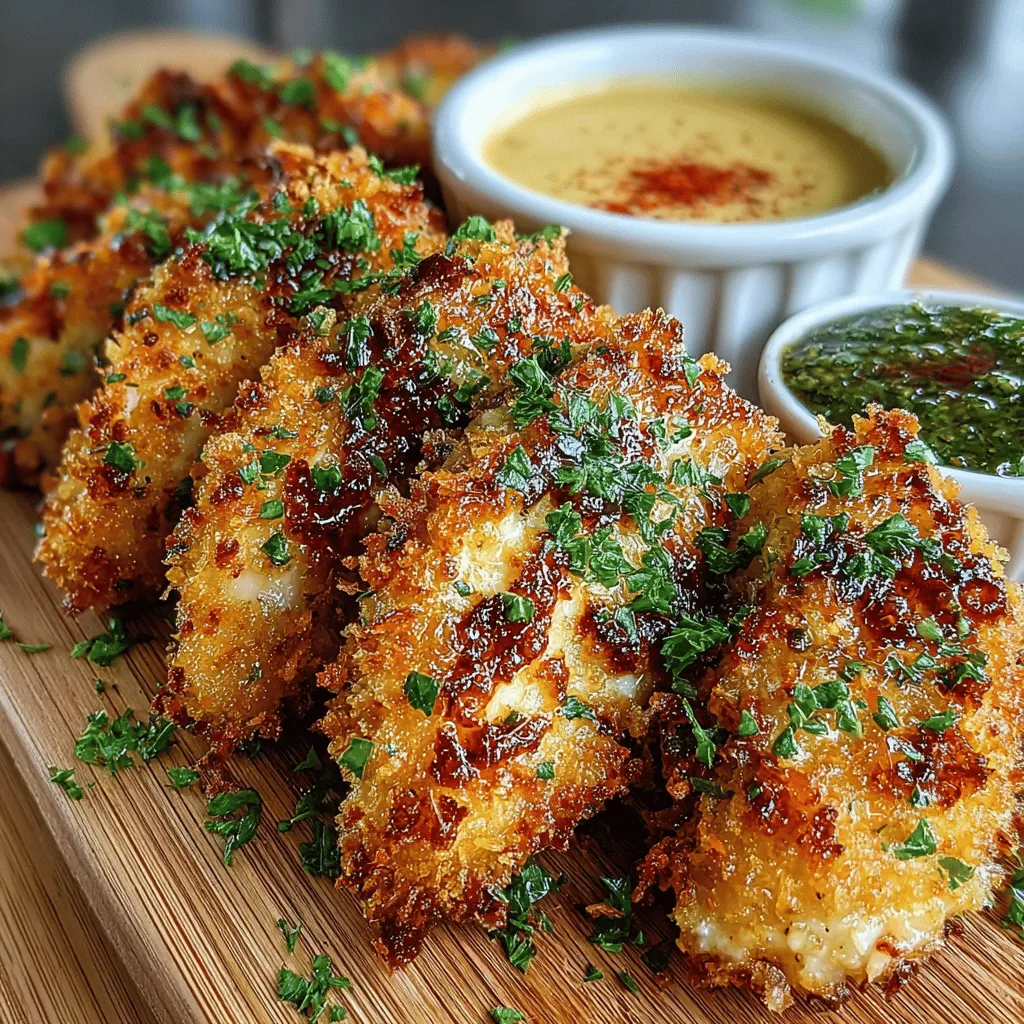
The coating is what truly sets crispy chicken tenders apart. In this recipe, we use a combination of all-purpose flour and Panko breadcrumbs. Flour serves as the initial layer, providing a base for the breadcrumbs to adhere to, while Panko breadcrumbs contribute to the signature crunch that we all crave. Their larger flakes create a light and airy texture that fries up beautifully, resulting in a crispy exterior that contrasts perfectly with the tender chicken inside.
Honey Mustard Dip
No chicken tender is complete without the perfect dipping sauce. Our honey mustard dip strikes a harmonious balance between sweetness and tanginess, making it the ideal accompaniment to the crispy chicken. Combining honey, mustard, and a touch of mayonnaise creates a creamy texture and complex flavor that enhances the overall dining experience. This dip is easy to prepare and can be adjusted to suit your personal taste preferences, whether you like it sweeter or spicier.
Preparing the Chicken Tenders
The first step in crafting your crispy chicken tenders involves marinating the chicken in buttermilk. This process not only enhances the flavor but also ensures that the chicken remains moist during cooking. Here’s how to do it:
Marination Process
1. Cutting the Chicken: Begin by slicing the chicken breast into uniform strips, approximately 1 inch wide. This ensures even cooking and allows for the perfect ratio of crispy coating to tender chicken.
2. Creating the Marinade: In a large bowl, combine the buttermilk with your chosen seasonings: garlic powder, onion powder, smoked paprika, and oregano. Whisk the mixture until well combined.
3. Marinating the Chicken: Add the chicken strips to the buttermilk mixture, ensuring that each piece is fully submerged. Cover the bowl with plastic wrap and refrigerate for at least one hour, or ideally overnight. This extended marination time allows the flavors to penetrate the chicken, resulting in a tender and flavorful final product.
Seasoning the Marinade
While preparing the marinade, it’s important to focus on the balance of flavors. The seasonings not only enhance the chicken but also infuse the buttermilk itself, ensuring that each bite is packed with flavor. The garlic and onion powders provide a savory backbone, while the smoked paprika introduces a subtle smokiness that complements the crispy coating. The oregano adds a hint of freshness, tying all the flavors together beautifully.
Once the marination process is complete, you will be ready to create the perfect coating for your chicken tenders.
Creating the Perfect Coating
The coating is a pivotal step in achieving that coveted crispy texture. The combination of flour and Panko breadcrumbs is key to delivering a satisfying crunch that contrasts beautifully with the tender chicken. Here’s how to create the perfect coating for your chicken tenders:
Flour and Breadcrumb Mixture
1. Preparing the Coating: In a shallow dish, combine all-purpose flour with additional seasonings, such as salt and pepper, to taste. This seasoned flour will create a flavorful base for the chicken.
2. Panko Breadcrumbs: In a separate shallow dish, place the Panko breadcrumbs. These will provide the final layer of crunch, so it’s essential to use them for the best texture.
Double-Dipping Technique
To ensure maximum crispiness, we recommend a double-dipping technique:
1. First Dip: Remove the marinated chicken strips from the buttermilk, allowing any excess to drip off. Dredge each piece in the seasoned flour, coating it evenly.
2. Second Dip: After the chicken is coated in flour, return it to the buttermilk briefly, then dredge it once more in the Panko breadcrumbs. This double-dipping method creates a thicker, crunchier coating that will fry up beautifully.
3. Resting the Coated Chicken: Once all the chicken strips are coated, let them rest on a wire rack for about 10 minutes. This allows the coating to adhere better and helps achieve a crispier texture when fried.
With your chicken tender preparation complete, you’re now just a few steps away from frying up these delicious bites. The combination of juicy chicken, flavorful marinade, and crispy coating makes for an irresistible dish that can be enjoyed by all. In the next section, we’ll cover the frying process and how to prepare the accompanying honey mustard dip, ensuring that your meal is ready to impress.
Frying Techniques for Crispy Chicken
Choosing the Right Oil
Selecting the right oil is crucial for achieving perfectly crispy chicken tenders. The best options for frying include oils with high smoke points, such as canola oil, peanut oil, or vegetable oil. These oils can withstand high temperatures without breaking down, allowing for a crispier texture. Avoid using olive oil for frying chicken tenders, as its lower smoke point may lead to a burnt taste and unappealing texture.
When frying, consider the flavor of the oil as well. Neutral oils like canola won’t interfere with the taste of the chicken, while peanut oil adds a subtle, nutty flavor that can enhance the overall dish. Always ensure the oil is fresh, as old oil can impart off-flavors to your food.
Temperature Control
Maintaining the right oil temperature is vital for achieving that golden-brown crust on your chicken tenders. The ideal frying temperature ranges between 350°F to 375°F (175°C to 190°C). If the oil is too cool, the chicken will absorb more oil, resulting in a soggy texture. Conversely, if the oil is too hot, the exterior may brown too quickly while the inside remains undercooked.
To accurately gauge the temperature, use a cooking thermometer. If you don’t have one, you can drop a small piece of bread into the oil; it should brown in about 60 seconds if the oil is at the right temperature. Additionally, when frying, be prepared to adjust the heat as necessary to maintain the desired temperature throughout the cooking process.
Batch Cooking
Frying chicken tenders in batches is essential to avoid overcrowding the pan, which can lower the oil’s temperature and lead to uneven cooking. Aim to fry only a few tenders at a time, allowing enough space for the oil to circulate around each piece. Depending on the size of your frying pan, this may mean cooking 3-4 tenders at a time.
As the chicken cooks, use a slotted spoon to remove them and place them on a wire rack set over a baking sheet. This allows any excess oil to drip off and keeps the chicken crispy. If you find that your oil is getting too cool during the frying process, turn up the heat slightly to maintain a consistent temperature.
Making the Honey Mustard Dip
Ingredients Breakdown
The honey mustard dip for your crispy chicken tenders is incredibly easy to make, featuring just a few simple ingredients that perfectly complement the savory flavor of the chicken. Here’s what you’ll need:
– Yellow Mustard: Its tangy flavor cuts through the richness of the fried chicken.
– Honey: Adds a natural sweetness and balances the acidity of the mustard.
– Mayonnaise: Provides creaminess and helps create a smooth texture.
– Apple Cider Vinegar: A splash of vinegar enhances the dip’s flavor and adds a bit of tang.
You can also customize this dip by adding a pinch of garlic powder, onion powder, or even a dash of cayenne pepper for a spicy kick. This versatility allows you to tailor the dip to your taste preferences.
Whisking for Consistency
To prepare the honey mustard dip, start by combining the yellow mustard, honey, and mayonnaise in a mixing bowl. Using a whisk, blend these ingredients thoroughly until smooth. The key to achieving the right consistency is to ensure there are no lumps, and whisking will help incorporate air into the mixture, making it light and fluffy.
After mixing, taste the dip and adjust the ingredients to your liking. If you prefer it sweeter, add more honey; if you like it tangier, increase the mustard or vinegar. For the best flavor, let the dip sit for at least 15 minutes before serving, allowing the ingredients to meld together. This dip can be made ahead of time and stored in the fridge in an airtight container for up to a week.
Serving Suggestions
Presentation Ideas
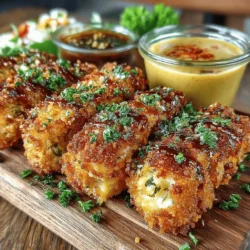
When it comes to serving your crispy chicken tenders, presentation can elevate the dining experience. Place the tenders on a large platter lined with parchment paper for a rustic touch. You can arrange them in a fan shape or stack them for a more casual look. Drizzle some of the honey mustard dip over the top for an eye-catching contrast, and serve the remaining dip in a small bowl or ramekin on the side for easy dipping.
For an extra touch, consider garnishing the platter with fresh herbs, such as parsley or cilantro, or adding some colorful vegetable sticks like carrots and cucumbers. This not only enhances the visual appeal but also provides a healthy crunch alongside the tenders.
Pairing Options
Crispy chicken tenders pair wonderfully with a variety of side dishes and drinks. For a classic combination, serve them with French fries or sweet potato fries. A fresh coleslaw or a simple green salad can add a refreshing crunch to the meal, balancing out the richness of the chicken.
For beverages, consider pairing your meal with a light beer or a crisp white wine, such as Sauvignon Blanc, which complements the flavors of the chicken and dip beautifully. If you prefer non-alcoholic options, lemonade or iced tea are excellent choices that add a refreshing touch.
Nutritional Information
Caloric Breakdown
The nutritional content of the crispy chicken tenders with honey mustard dip can vary based on the cooking method and portion sizes. On average, one serving of chicken tenders (about 3-4 pieces) contains approximately 300-400 calories, while the honey mustard dip adds an additional 50-100 calories per serving. The breakdown includes protein from the chicken, fats from the oil and mayonnaise, and carbohydrates from any breading.
It’s essential to remember that these figures can change based on the ingredients and how the dish is prepared. For a more accurate count, consider using a nutrition calculator based on the specific brands and quantities you use.
Healthier Alternatives
If you’re looking to lighten up this dish without sacrificing flavor, there are several alternatives you can try. Instead of frying, consider baking the chicken tenders. Simply coat them in the same breading mixture and place them on a parchment-lined baking sheet. Spray them lightly with cooking spray and bake at 425°F (220°C) for about 15-20 minutes, or until golden brown and cooked through.
For the honey mustard dip, you can substitute Greek yogurt for mayonnaise to reduce calories and add a protein boost. This swap will give you a creamy texture while cutting down on fat content.
Conclusion
Crispy chicken tenders with honey mustard dip are a delightful combination of flavors and textures, making them a perfect choice for any meal or gathering. Their simplicity and versatility appeal to both adults and children, ensuring that everyone at the table will enjoy them. By mastering the frying techniques, perfecting the honey mustard dip, and presenting the dish creatively, you can create a comforting and satisfying meal that brings joy to your dining experience.
Whether you choose to serve them as a main dish or as a snack for game day, these chicken tenders are sure to impress. Enjoy the satisfaction of creating a homemade favorite that not only tastes great but also brings smiles to your table.