
Crispy Cinnamon Apple Hand Pies Recipe
Hand pies are a delightful dessert that merges convenience with indulgence, offering a perfect balance of flaky pastry and sweet filling. These portable treats have gained popularity for their charming size and the ability to be enjoyed on-the-go, making them an ideal snack for picnics, parties, or simply a cozy evening at home. Among the myriad of hand pie options, Cinnamon Apple Hand Pies stand out with their warm, comforting flavors reminiscent of a classic apple pie but in a more portable format. The combination of tender, spiced apples enveloped in a crispy crust makes these hand pies not only delicious but also a nostalgic reminder of home baking.
The flavor profile of Cinnamon Apple Hand Pies is a harmonious blend of sweet and tart, with the comforting warmth of cinnamon that evokes the essence of autumn. This recipe captures the essence of homemade goodness, allowing you to customize the sweetness and spice level to your liking. Whether you are an experienced baker or a novice in the kitchen, making these hand pies from scratch is a gratifying experience that fills your home with the inviting aroma of baked apples and warm spices.
One of the most appealing aspects of homemade pastries like these hand pies is their versatility. You can easily adapt the filling by incorporating different fruits or spices, depending on your preferences or seasonal availability. This flexibility, combined with the comforting nature of freshly baked goods, makes Cinnamon Apple Hand Pies a cherished recipe to keep on hand for any occasion.
Understanding the Ingredients
The foundation of any great pastry lies in its ingredients. For our Cinnamon Apple Hand Pies, we will break down the essential components of both the dough and the filling to ensure you achieve the perfect balance of flavor and texture.
Dough Components
All-Purpose Flour: The backbone of our pastry, all-purpose flour provides the necessary structure for the hand pies. It contains a moderate amount of protein, which helps create gluten when mixed, giving the dough its elasticity and strength. When making pastry, it’s crucial not to overmix the dough to maintain a tender texture.
Cold Unsalted Butter: Using cold unsalted butter is vital for achieving that desirable flaky texture in our dough. As the butter melts during baking, it creates steam, leading to the formation of delicate layers in the crust. Unsalted butter also allows you to control the salt content, ensuring a balanced flavor.
Salt and Sugar: A pinch of salt enhances the overall flavor of the pastry while sugar contributes a hint of sweetness. Together, they elevate the taste and help to create a harmonious balance in the dough.
Ice Water: The addition of ice water is essential for bringing the dough together without overworking it. The cold temperature helps keep the butter solid, which is key for maintaining the flakiness of the pastry. Adding just enough water to bind the dough will yield the best results.
Filling Ingredients
Apples: The choice of apples greatly influences the taste and texture of the filling. Tart varieties like Granny Smith are excellent for baking due to their firm texture and balanced acidity. On the other hand, sweet varieties like Honeycrisp can add natural sweetness and juiciness. A combination of both can create a more complex flavor profile, ensuring that the filling is neither too sweet nor too tart.
Brown Sugar: Brown sugar is preferred for its rich, molasses-like flavor, which enhances the sweetness of the apples while also adding moisture to the filling. This not only helps to create a luscious filling but also contributes to a beautifully caramelized texture.
Spices: Cinnamon is a classic spice that brings warmth and depth to the filling, perfectly complementing the flavor of the apples. Adding a hint of nutmeg can further enhance the complexity of the flavor, providing a cozy, seasonal touch.
Lemon Juice and Cornstarch: A splash of lemon juice brightens the flavors of the filling and helps to balance the sweetness. Cornstarch acts as a thickening agent, ensuring that the filling holds together when baked, preventing any unwanted runniness.
Step-by-Step Guide to Making Crispy Cinnamon Apple Hand Pies
With a solid understanding of the ingredients, we can now delve into the process of making these delightful hand pies, starting with the dough.
Making the Dough
1. Mixing the Ingredients: Begin by combining the all-purpose flour, sugar, and salt in a large mixing bowl. Use a whisk to ensure the dry ingredients are well blended. Next, add the cold unsalted butter, cut into small cubes. Using a pastry cutter or your fingers, work the butter into the flour mixture until it resembles coarse crumbs with some pea-sized pieces of butter remaining. This step is crucial for achieving that flaky texture.
2. Adding Ice Water: Gradually add ice water, one tablespoon at a time, mixing gently with a fork until the dough begins to come together. Be careful not to overmix; you want to maintain those small pieces of butter for flakiness. If the dough feels too dry, add a little more ice water as needed.
3. Chilling the Dough: Once the dough is formed, turn it out onto a lightly floured surface and shape it into a flat disk. Wrap it in plastic wrap and refrigerate for at least 30 minutes. This resting period allows the gluten to relax, making the dough easier to roll out and helping to maintain its flakiness during baking.
Preparing the Filling
While the dough chills, you can prepare the filling for your Cinnamon Apple Hand Pies.
1. Selecting and Preparing the Apples: Peel, core, and slice your chosen apples into thin wedges. Aim for uniform pieces to ensure even cooking. If using both Granny Smith and Honeycrisp apples, you’ll achieve a delightful balance of tartness and sweetness.
2. Mixing the Filling Ingredients: In a large bowl, combine the sliced apples with brown sugar, cinnamon, nutmeg (if using), lemon juice, and cornstarch. Toss everything together until the apples are evenly coated. The cornstarch will help absorb excess moisture released by the apples during baking, resulting in a perfect filling consistency.
With the dough chilling and the filling prepared, you’re well on your way to creating your own batch of Crispy Cinnamon Apple Hand Pies. In the following sections, we will explore how to assemble and bake these delightful pastries, ensuring that they turn out perfectly crispy and delicious every time. Stay tuned for the next steps in this scrumptious baking adventure!
Crispy Cinnamon Apple Hand Pies are a delightful treat that perfectly combines the sweetness of apples with the warmth of cinnamon, all wrapped in a flaky pastry crust. These hand pies are not only delicious but also easy to make, making them a favorite for gatherings or a cozy dessert at home. Here’s how to create these delightful pastries from start to finish.
Mixing the Filling Ingredients
To create a balanced flavor in your apple filling, it’s essential to properly mix the ingredients. Begin by selecting fresh apples, ideally a mix of tart and sweet varieties such as Granny Smith and Honeycrisp. This combination will provide depth and complexity to the filling.
Ingredients for the Filling:
– 4 cups of peeled, cored, and chopped apples
– 1/2 cup granulated sugar
– 2 tablespoons all-purpose flour (for thickening)
– 1 teaspoon ground cinnamon
– 1/4 teaspoon ground nutmeg (optional)
– 1 tablespoon lemon juice (to enhance flavor and prevent browning)
In a large mixing bowl, combine the chopped apples with sugar, flour, cinnamon, nutmeg, and lemon juice. It’s important to toss the ingredients gently but thoroughly to ensure that every piece of apple is coated with the mixture. This step not only sweetens the apples but also helps thicken the filling during baking.
Letting the Filling Sit
Once mixed, allow the filling to sit for about 15-30 minutes. This resting period is crucial as it allows the apples to release some moisture, which helps to meld the flavors together and makes the filling juicier. Additionally, the flour will start to absorb some of this liquid, creating a thicker filling that won’t seep out of the hand pies while baking.
Rolling Out the Dough
With the filling prepared, it’s time to roll out the dough. For the perfect hand pie crust, you want a balance between thickness and flakiness.
Techniques for Achieving the Perfect Thickness
After chilling your dough, turn it out onto a lightly floured surface. Using a rolling pin, roll the dough evenly to about 1/8 inch thick. This thickness is ideal as it provides a sturdy base for your filling while ensuring that the crust remains crispy when baked.
To maintain an even thickness, start rolling from the center and work your way outwards, turning the dough a quarter turn after each roll. This technique helps prevent the dough from sticking to the surface and ensures a circular shape.
Cutting Out Uniform Circles
Using a round cookie cutter or a glass with a diameter of about 4-5 inches, cut out uniform circles from the rolled dough. Re-roll any scraps to cut additional circles, ensuring you have enough for the top and bottom of each hand pie. Aim for a consistent size to ensure even baking and a professional appearance.
Filling and Shaping the Hand Pies
Now that you have your dough circles cut out, it’s time to fill and shape your hand pies.
Portioning the Filling Correctly
Spoon about 1-2 tablespoons of the apple filling onto one half of each dough circle, being careful not to overfill. Overfilling can lead to messy hand pies that burst during baking. It’s better to err on the side of caution; if in doubt, less is more.
Sealing and Crimping Edges
Once the filling is in place, fold the dough over to create a half-moon shape. Press the edges together to seal the filling inside. For a professional finish, use a fork to crimp the edges, creating a decorative pattern while ensuring the hand pies are well-sealed. You might also use your fingers to pinch the edges together for a rustic look.
Baking to Perfection
With the hand pies filled and sealed, it’s time to bake them to golden perfection.
Preheating the Oven
Preheat your oven to 375°F (190°C) before placing the hand pies inside. Preheating is crucial as it helps the pies bake evenly. An oven that is not adequately heated can result in soggy bottoms and unevenly cooked fillings.
Recognizing When the Hand Pies Are Perfectly Baked
Bake the hand pies for about 20-25 minutes or until they turn golden brown. Keep an eye on them, as oven temperatures can vary. The crust should be crisp to the touch, and the filling may bubble slightly from the edges. If you notice the tops browning too quickly, you can cover them loosely with aluminum foil to prevent burning.
Serving Suggestions and Presentation
Once baked, let the hand pies cool slightly on a wire rack. They can be served warm or at room temperature, making them versatile for any occasion.
Ideas for Serving
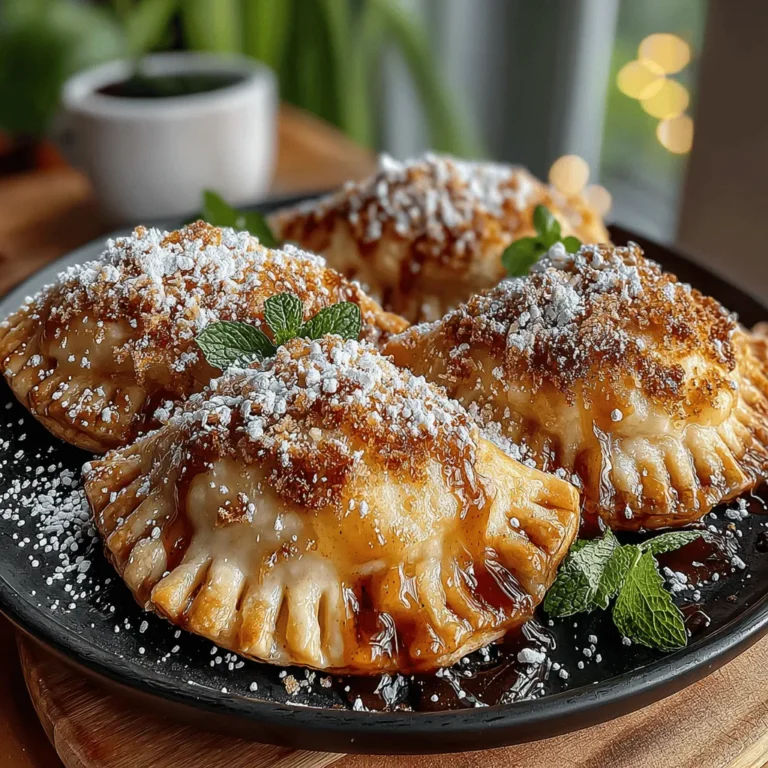
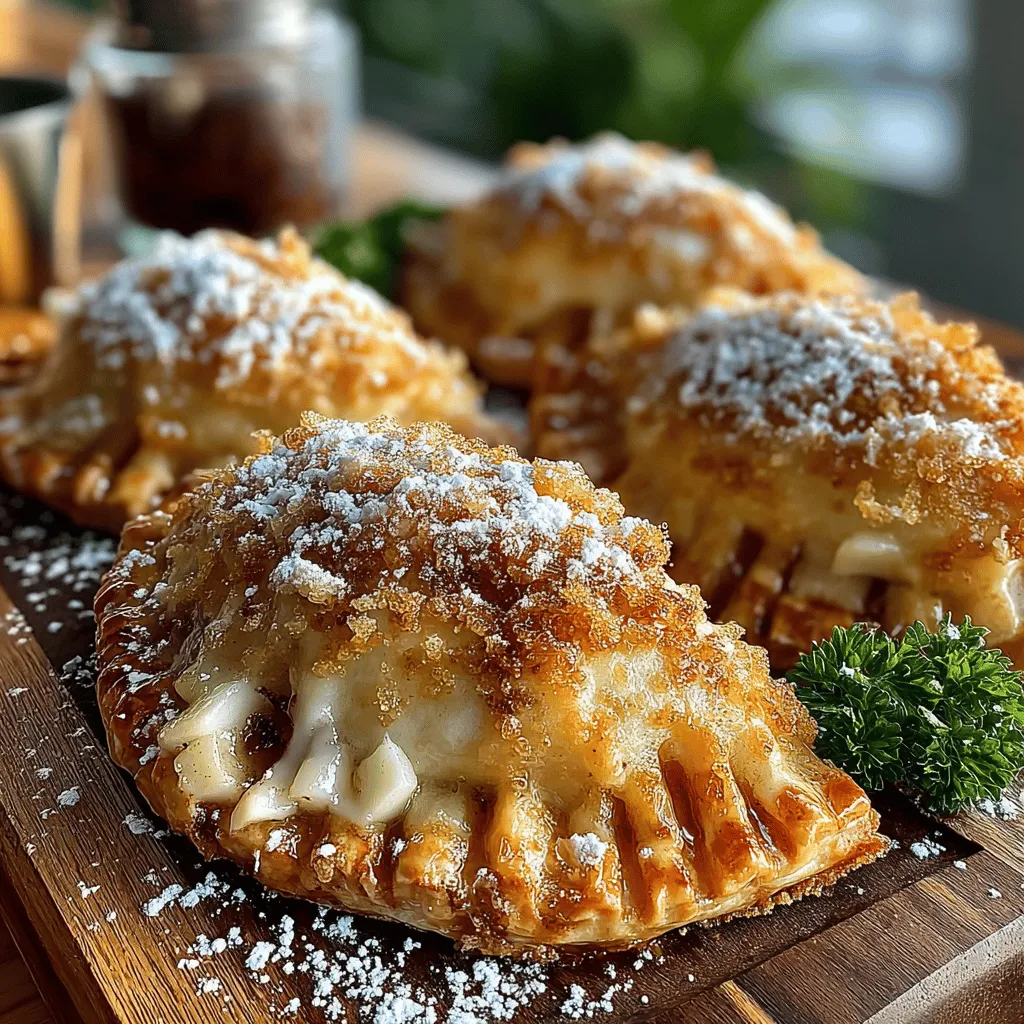
For a touch of sweetness, dust the tops of the hand pies with powdered sugar before serving. This simple addition not only enhances their appearance but also adds an extra layer of flavor.
Consider pairing your hand pies with a dollop of whipped cream or a scoop of vanilla ice cream for a decadent dessert experience. The creamy textures complement the crispy hand pies perfectly, creating a delightful contrast.
Creative Presentation Ideas
If you’re serving these hand pies at a gathering or special occasion, consider arranging them on a decorative platter. You can garnish the platter with fresh apple slices or cinnamon sticks for an inviting presentation. Additionally, consider wrapping individual hand pies in parchment paper and tying them with twine for a rustic, homemade touch that guests will appreciate.
Nutritional Information and Storage Tips
Crispy Cinnamon Apple Hand Pies are not only a treat but also carry some nutritional value, especially when using fresh apples.
Overview of Nutritional Aspects
Each hand pie is a good source of carbohydrates, fiber from the apples, and essential vitamins like Vitamin C. However, they can also be high in sugar and calories, particularly if you use a lot of added sugar in the filling or a rich crust. For a healthier option, consider reducing the sugar or using whole wheat flour for the crust.
Best Practices for Storing Leftovers
If you have any hand pies leftover, store them in an airtight container at room temperature for up to 2 days. For longer storage, they can be frozen for up to 2 months. To freeze, place them in a single layer on a baking sheet until firm, then transfer to a freezer-safe bag or container.
Reheating Methods
To reheat, simply place the frozen pies in a preheated oven at 350°F (175°C) for about 10-15 minutes, or until heated through. This will help retain their crispiness, ensuring they taste freshly baked.
Conclusion
Making homemade Crispy Cinnamon Apple Hand Pies is a delightful experience that yields delicious results. The combination of flaky pastry and spiced apple filling is sure to satisfy any sweet tooth, providing a comforting taste of traditional desserts. Whether enjoyed on a chilly evening or served at a festive gathering, these hand pies are a treat that everyone will love.
We encourage you to try this recipe and savor the wonderful flavors of these classic hand pies. The satisfaction that comes from creating something homemade and sharing it with loved ones is truly unparalleled. Happy baking!
